Back First Aid Explained
How to Do First Aid on a Choking Baby

We have selected the following expert medical opinion based on its clarity, reliability and accuracy. Credits: Sourced from the website wikiHow. Please refer to your own medical practitioner for a final perspective, assessment or evaluation.
Overview
If you ever find yourself in a situation where you have to administer first aid to a choking baby, it is important to be prepared. The recommended procedure is to perform back blows and chest or abdominal thrusts to dislodge the blockage, followed by modified CPR if the baby becomes unresponsive. Be aware that there are different procedures to follow depending on whether you are dealing with a baby who is less than twelve months old, or a baby or toddler who is older than a year - both of which are outlined below.
1: Assessing the Situation
1. Allow the baby to cough
If the baby is coughing or gagging, this means that their airway is only partially blocked, so they are not being completely deprived of oxygen. If this is the case, allow the baby to continue coughing, as coughing is the most effective way to clear any obstructions.
- If your baby is making choking noises and they are old enough to understand you, try instructing them to cough or demonstrate how to do it before administering first aid.
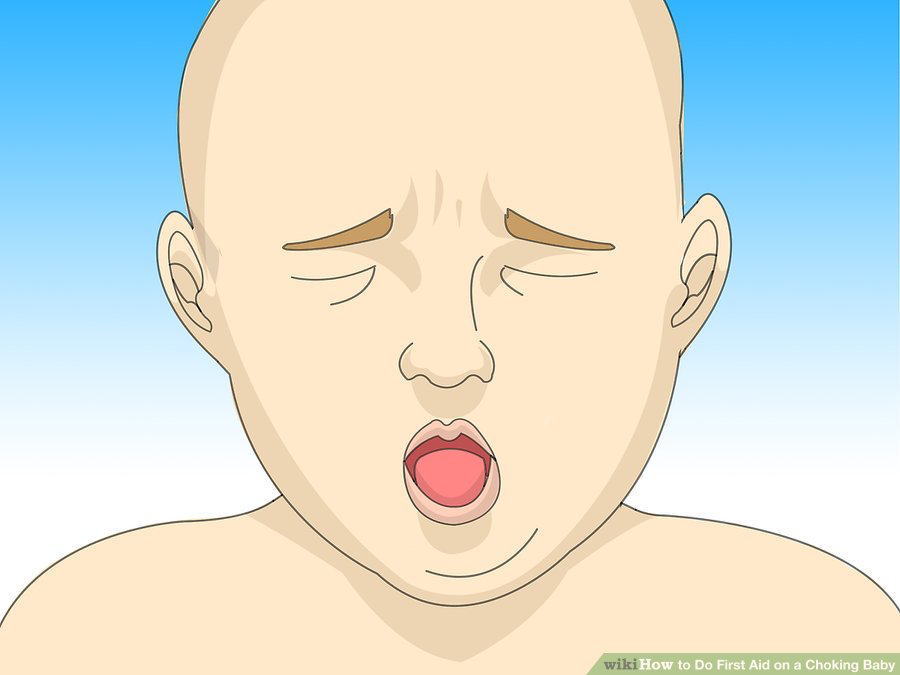
2. Look for symptoms of choking
If the baby is unable to cry or make noise, their airway is completely blocked and they will be unable to remove the obstruction by coughing.
Other symptoms that indicate choking include:
- Producing an odd, high-pitched sound or an inability to make any sound at all.
- Clutching at the throat.
- Skin turning bright red or blue.
- Lips and fingernails turning blue.
- Unconsciousness.

3. Do not attempt to remove the obstruction by hand
Whatever you do, do not attempt to remove the obstruction yourself by sticking your hand down the baby's throat. This may cause the object the become lodged more deeply, or damage the baby's throat.

4. Call local emergency services, if possible (see "EMERGENCY NUMBERS" above)
Once you have ascertained that the baby is choking, your next step is to perform emergency first aid. If the baby is deprived of oxygen for too long they will lose consciousness and may suffer brain damage or even death.
In such an emergency situation, it is important to have trained healthcare professionals on the scene as quickly as possible:
- If possible, have another person call local emergency services immediately, while you administer first aid. For your local number, check "EMERGENCY NUMBERS" above.
- If you are alone with the baby, start administering first aid immediately. Do this for two minutes, then stop and call emergency services. Resume care until the health care professionals arrive.
- Note that if the baby suffers from any heart conditions or you suspect that they are experiencing an allergic reaction (where the throat closes up), you should call emergency services immediately, even if you are alone.

2: Performing First Aid on Babies Less Than Twelve Months Old
1. Position the baby correctly
When administering first aid to a baby younger than a year, it is important that you support the head and neck at all times.
To get the baby in a safe, professionally-recommended position for administering first aid, do the following:
- Slide one arm under the baby's back so that your hand is cradling their head and their back is resting against your forearm.
- Place your other arm firmly along the baby's front, so there is sandwiched between your forearms. Use your top hand to securely grasp the baby's jaw between your thumb and fingers, without covering their airways.
- Gently flip the baby onto their front, so they are now resting on the opposite forearm. Keep their head supported by the jaw.
- Rest your arm against your thigh for added support and ensure that the baby's head is lower than the rest of her body. You are now in the correct position to perform back blows.

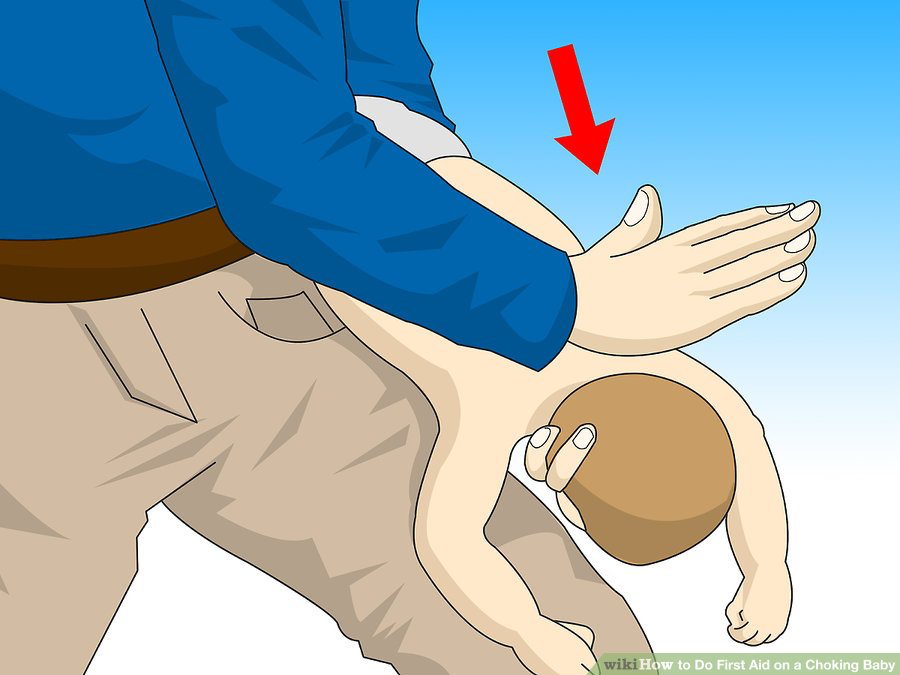
2. Perform five back blows
Back blows create pressure and vibration in the baby's airway, which is often enough to dislodge any stuck objects.
To perform a back blow on a baby less than twelve months old:
- Use the heel of your hand to firmly hit the baby on the back, between the shoulder blades. Ensure that you are adequately supporting the head as you do this.
- Repeat this movement up to five times. If this does not dislodge the object, move on to performing chest thrusts.
3. Reposition the baby
Before you can perform a chest thrust, you will need to turn the baby over.
To do this:
- Place your free arm (which you were previously using to perform the back blows) along the baby's back and cradle the back of her head in your hand.
- Gently turn them over, keeping your other hand and arm firmly pressed against their front.
- Lower the arm supporting the baby's back, so that it's resting against your thigh. Again, ensure that the baby's head is lower than the rest of her body.

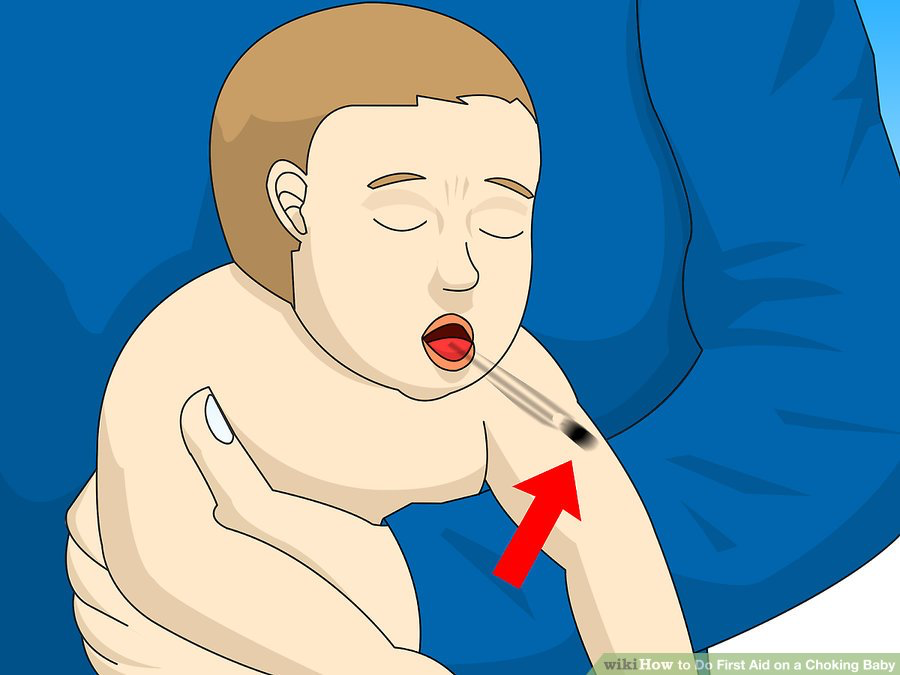
4. Perform five chest thrusts
Chest thrusts force the air out of the baby's lungs, which may be enough to dislodge the object.

To perform a chest thrust on a baby less that a year old:
- Place two or three fingertips in the center of the baby's chest, just below their nipples.
- Push inwards and upwards, applying enough pressure to compress the baby's chest about 1 1/2 inches (3.8 cm). Allow the baby's chest to return to its normal position before repeating up to five times.
- When compressing the baby's chest, ensure that the movements are firm and controlled, rather than jerky. Your fingers should be in contact with the baby's chest at all times.

5. Repeat until the obstruction is dislodged
Alternate between giving the baby five back blows and five chest compressions until the object becomes dislodged, the baby starts crying or coughing, or the emergency services arrive.
6. If the baby loses consciousness, perform modified CPR
If the baby becomes unresponsive and emergency services have still not arrived, you will need to perform modified CPR on the baby. Be aware that modified CPR is different from normal CPR, as it is tailored to be performed on small babies.

3: Performing Modified CPR on Babies Less Than Twelve Months Old
1. Check the baby's mouth for an object
Before you begin CPR, you should check the baby's mouth to see if the object they were choking on has become dislodged. Lie the baby on their back, on a firm, flat surface.
- Use your hand to open the baby's mouth and look inside. If you see something, remove it using your baby finger.
- Even if you can't see anything, proceed to the next step.
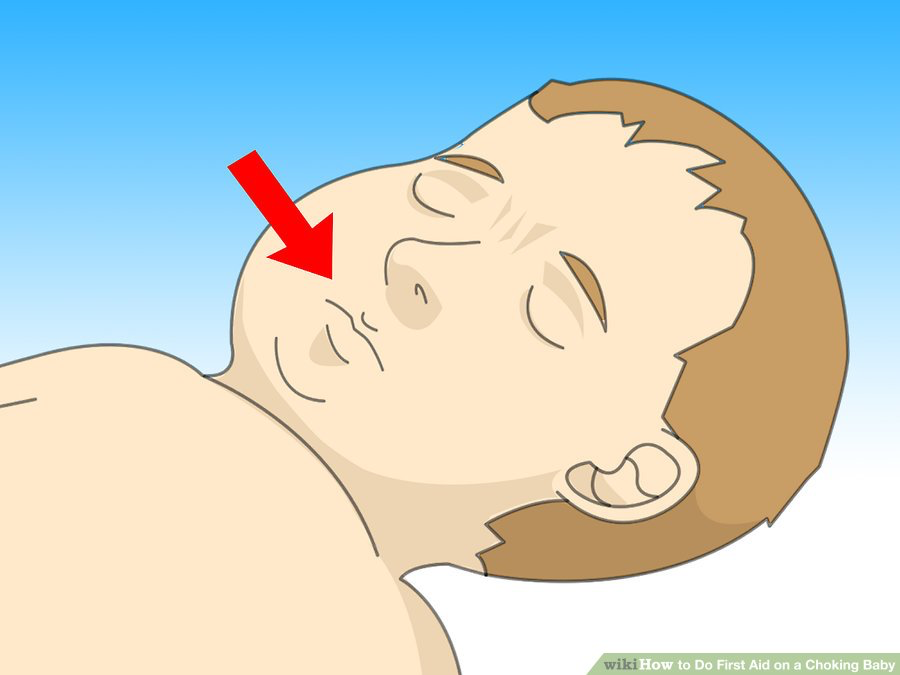
2. Open the baby's airway
You can do this by using one hand to tilt the baby's head back slightly and the other to lift their chin. Don't tilt their head back too far, it takes very little to open a small baby's airway.

3. Check if the baby is breathing
Before proceeding with CPR, you should check to ensure the baby is not breathing. You can do this by placing your cheek very close to the baby's mouth, looking towards their body.
- If they are breathing, you should be able to see their chest rising and falling slightly.
- In addition, you may be able to hear breathing noises and feel their breath on your cheek.

4. Give the baby two rescue breaths
Once you have confirmed that the baby is not breathing, you can begin CPR. Begin by covering their mouth and nose with your own mouth and blow two small rescue breaths gently into their lungs.
- Each breath should last for about a second and you should see the baby's chest rise as the air goes in. Pause between breaths to allow the air to escape.
- Remember that a baby's lungs are very small, so you shouldn't blow too much air or blow too forcefully.

5. Perform thirty chest compressions
Once you have performed the rescue breaths, leave the baby lying on her back and use the same technique you used earlier for the chest thrusts - that is, using two or three fingers to firmly compress the baby's chest by about 1 1/2 inches (3.8 cm).
- Press straight down on the baby's breastbone, in the center of the baby's chest, slightly below the nipples.
- The chest compressions should be performed at a rate of 100 compressions per minute. This means that you should be able to get through the thirty recommended compressions, in addition to the two rescue breaths, in approximately 24 seconds.

6. Give another two rescue breaths followed by thirty chest compressions and repeat for as long as necessary
Repeat this cycle of two rescue breaths, followed by thirty chest compressions, until the baby starts breathing again and regains consciousness or until emergency services arrive.
- Even if the baby starts breathing again, they will need to be examined by a healthcare professional to ensure that they have sustained no further injuries.

4: Performing First Aid on Babies and Toddlers Older Than a Year
1. Administer five back blows
To give first aid to a child older than twelve months, sit or stand behind them and place an arm diagonally across their chest. Lean the child forward slightly, so they are resting against your arm. With the heel of your free hand, administer five firm and distinct blows to the child's back, directly between the shoulder blades. If this does not dislodge the object, move on to abdominal thrusts.

2. Administer five abdominal thrusts
An abdominal thrust - also known as the Heimlich maneuver - works by forcing the air out of a person's lungs, in attempt to clear any obstructions from the airways. It is safe to perform on a child older than a year.
To administer an abdominal thrust:
- Stand or sit behind the choking child and wrap your arms around their waist.
- Make a fist with one hand and place it firmly on the child's stomach, thumb side in, slightly above the belly button.
- Wrap your other hand around the fist and deliver a quick upward and inward thrust to the child's abdomen. This motion should force air and any lodged objects out of the windpipe.
- For smaller children, be careful not to thrust against the breastbone, as this could cause injury. Keep your hands just above the navel.
- Repeat up to five times.

3. Repeat until the obstruction clears or the child starts coughing
If the child is still choking after five back blows and five abdominal thrusts, repeat the entire procedure again and continue to do so until the object becomes dislodged, the child starts coughing, crying or breathing, or emergency services arrives.

4. If the child becomes unresponsive, perform modified CPR
If the child still cannot breath and loses consciousness, you will need to perform modified CPR as quickly as possible.

5: Performing Modified CPR on Babies and Toddlers Older Than a Year
1. Check the child's mouth for an object
Before you begin CPR, open the child's mouth and look for any objects that may have become dislodged. If you see something, remove it with your fingers.

2. Open the child's airway
Next, open the child's airway by tilting their head back and their chin upward slightly. Check for breathing by placing your cheek next to the child's mouth.
- If they are breathing, you should either see their chest rising and falling slightly, hear breathing noises or feel their breath against your cheek.
- Do not proceed with CPR if the child is breathing on their own.

3. Give two rescue breaths
Pinch the child's nose and cover her mouth with your own. Give two rescue breaths, each lasting about a second. Make sure to pause between each breath to allow the air to come back out.
- If the rescue breaths are working, you should see the child's chest inflate as you exhale.
- If their chest does not inflate, their windpipe is still blocked and you should return to the first aid procedures to dislodge the obstruction.

4. Perform thirty chest compressions
Begin chest compressions by placing the heel of one hand on the child's breastbone, right between the nipples. Place the heel of your other hand on top and interlock your fingers.
Position your body directly above your hands and begin compressions:
- Each compression should be hard and fast, and should compress the child's chest by about 2 inches (5.1 cm). Allow the chest to return to its normal position between each compression.
- Count each of the thirty compressions out loud, as this will help you keep track. They should be performed at a rate of 100 compressions per minute.

5. Alternate between two rescue breaths and thirty chest compressions, for as long as necessary
Repeat the sequence of two rescue breaths followed by thirty chest compressions until the child starts breathing again or emergency services arrives.

_______________________________________________________________________________________________________________________
Are you a healthcare practitioner who enjoys patient education, interaction and communication?
If so, we invite you to criticise, contribute to or help improve our content. We find that many practicing doctors who regularly communicate with patients develop novel and often highly effective ways to convey complex medical information in a simplified, accurate and compassionate manner.
MedSquirrel is a shared knowledge, collective intelligence digital platform developed to share medical expertise between doctors and patients. We support collaboration, as opposed to competition, between all members of the healthcare profession and are striving towards the provision of peer reviewed, accurate and simplified medical information to patients. Please share your unique communication style, experience and insights with a wider audience of patients, as well as your colleagues, by contributing to our digital platform.
Your contribution will be credited to you and your name, practice and field of interest will be made visible to the world. (Contact us via the orange feed-back button on the right).
Disclaimer:
MedSquirrel is a shared knowledge, collective intelligence digital platform developed to share medical knowledge between doctors and patients. If you are a healthcare practitioner, we invite you to criticise, contribute or help improve our content. We support collaboration among all members of the healthcare profession since we strive for the provision of world-class, peer-reviewed, accurate and transparent medical information.
MedSquirrel should not be used for diagnosis, treatment or prescription. Always refer any questions about diagnosis, treatment or prescription to your Doctor.