Back First Aid Explained
How to Deliver a Baby

We have selected the following expert medical opinion based on its clarity, reliability and accuracy. Credits: Sourced from the website wikiHow. Please refer to your own medical practitioner for a final perspective, assessment or evaluation.
Overview
Whether you're an expectant parent or an unsuspecting cabbie, the time may come when you are called upon to help deliver a baby with no professional help in sight. Don't worry ? people have to do this all the time. Most of what you need to do is help the mother relax and let her body do the work. That being said, there are steps you can take to ensure that everything goes as smoothly as possible until help arrives.
Part 1: Preparing for the Birth
1. Call for help if possible
Contact emergency services (see "EMERGENCY NUMBERS" above). That way, even if you have to deliver the baby yourself, help will arrive soon if you experience complications. The dispatcher should also be able to either talk you through the delivery or connect you to someone who can.
- If the mother has a doctor or midwife, call that person too. The medical professional can often stay on the phone and help guide you through the process.

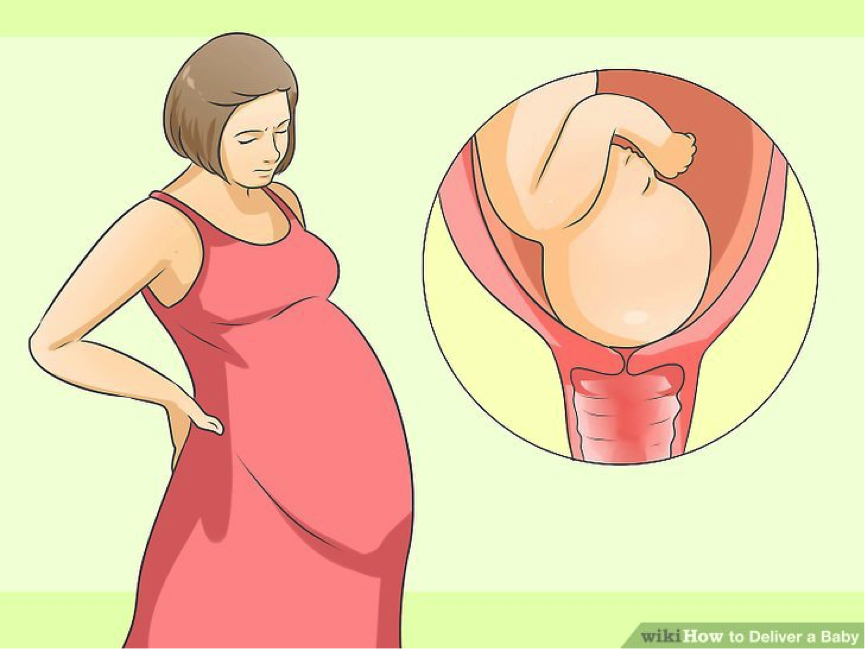
2. Determine how far labor has progressed
The first stage of labor is called the 'latent' stage, where the body is getting ready to deliver by dilating the cervix. It can take a long time, especially if this is the woman's first child. The second, or 'active' stage occurs when the cervix has completely dilated.
- Women may not experience as much pain or discomfort during this stage as later stages.
- If the woman is fully dilated and you can see the baby's head crowning, she's in stage two. Wash your hands, skip to the next section and get ready to catch the baby.
- Unless you have been trained to do so, don't try to examine the cervix. Just watch to see if the head begins to appear.
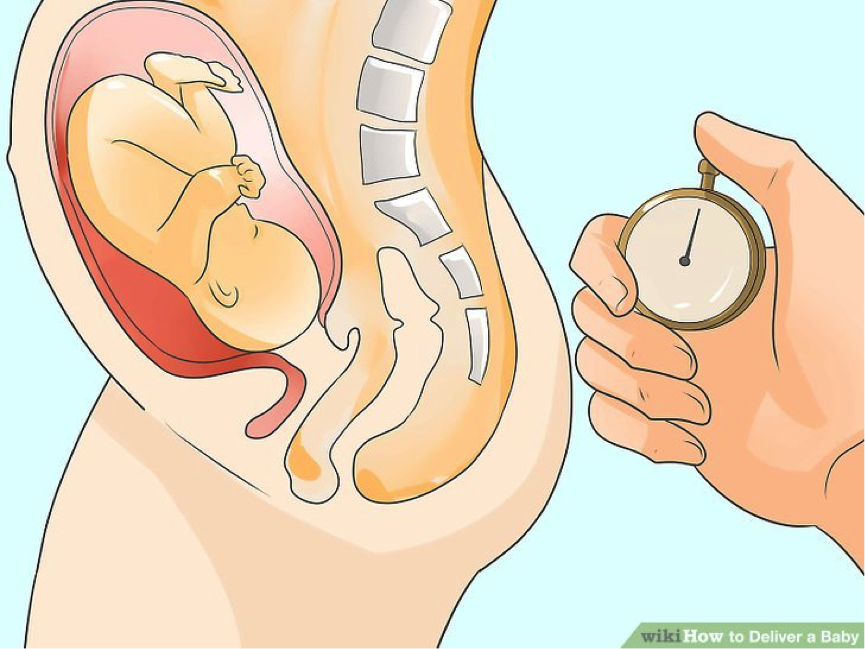
3. Time contractions
Time the contractions from the beginning of one to the beginning of the next, and note how long they last. The further along labor is, the more regular, stronger, and closer together contractions become.
Here's what you need to know about contractions:
- Contractions that are 10 minutes apart or less are a sign that the mother has entered labor. Physicians recommend that you contact the hospital when contractions are 5 minutes apart and last 60 seconds, and this activity has been going for for an hour. If this is the case, you probably have time to make it to the hospital if you live close to one.
- First-time mothers are likely to give birth when contractions are three to five minutes apart and last 40 to 90 seconds, increasing in strength and frequency for at least an hour.
- If the contractions are two minutes or less apart, buckle down and get ready to deliver the baby, especially if the mother's had other children and they were fast labors. Also, if the mother feels like she's going to have a bowel movement, the baby is probably moving through the birth canal, creating pressure on the rectum, and is on its way out.
- If the baby is preterm, you should contact the mother's physician and emergency services at any signs of labor.
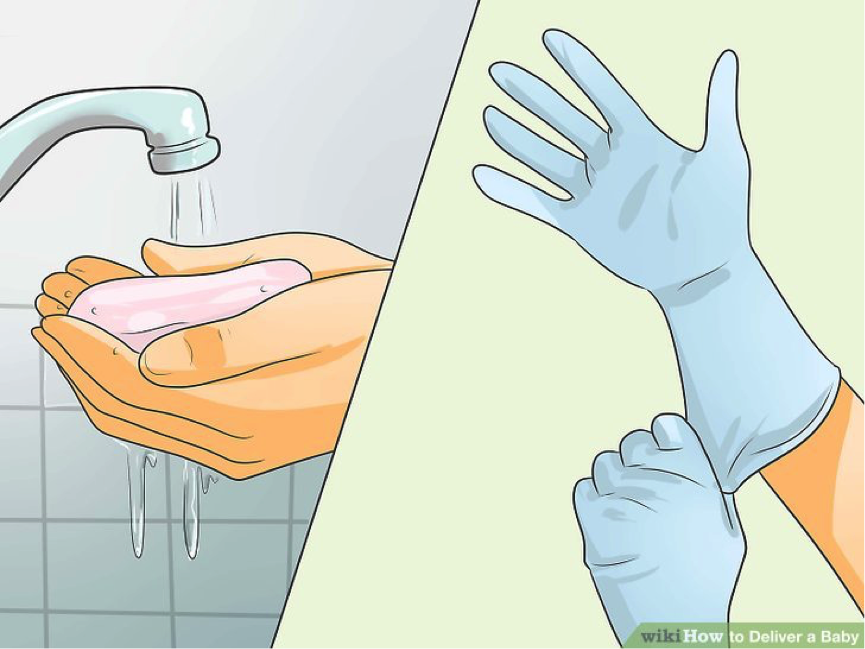
4. Sanitize your arms and hands
Remove any jewelry, such as rings or watches. Wash your hands thoroughly with antimicrobial soap and warm water. Scrub your arms all the way up to your elbows. If you have the time, wash your hands for five minutes; if you don't have time for that, wash them thoroughly for at least one minute.
- Remember to scrub in between your fingers and under your nails. Use a nail brush or even a toothbrush to clean under your nails.
- Wear sterile gloves if available. Don?t wear things like dishwashing gloves, which are likely loaded with bacteria.
- To finish (or if you don't have access to soap and water), use an alcohol-based hand sanitizing product or rubbing alcohol to kill off any bacteria and viruses that may have been on your skin. This helps prevent giving the mother or the baby an infection.
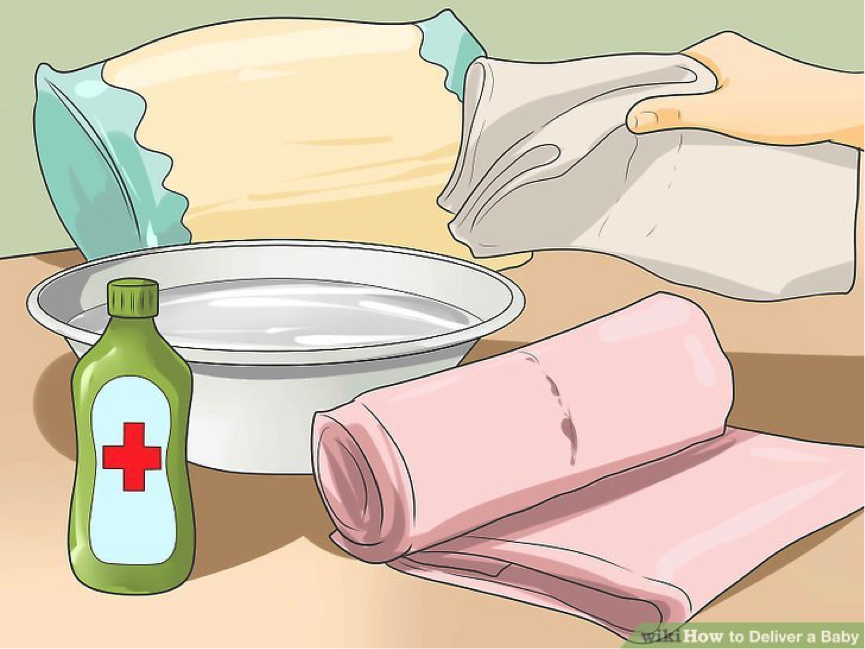
5. Prepare a birthing area
Get set up so that you have everything you'll need within easy reach, and so the mother is as comfortable as possible. There will be a mess afterwards, so you may want to have the birthing area somewhere you don't mind getting messy.
- Collect clean towels and clean sheets. If you have clean waterproof tablecloths or a clean vinyl shower curtain, these are excellent at preventing blood and other fluids from staining furniture or carpeting. In a pinch, you can use newspapers, but they are not as sanitary.
- Get a blanket or something warm and soft to wrap the baby in. The infant must be kept warm once it's delivered.
- Find a few pillows. You might need them to prop up the mother as she's pushing. Cover them with clean sheets or towels.
- Fill a clean bowl with warm water, and get a pair of scissors, a few lengths of string, rubbing alcohol, cotton balls, and a bulb syringe. You may find that sanitary napkins or paper towels are helpful to stop the bleeding later.
- Get a bucket in case the mother feels nauseated or the need to vomit. You may also want to get a glass of water for the mother. Labor is hard work.
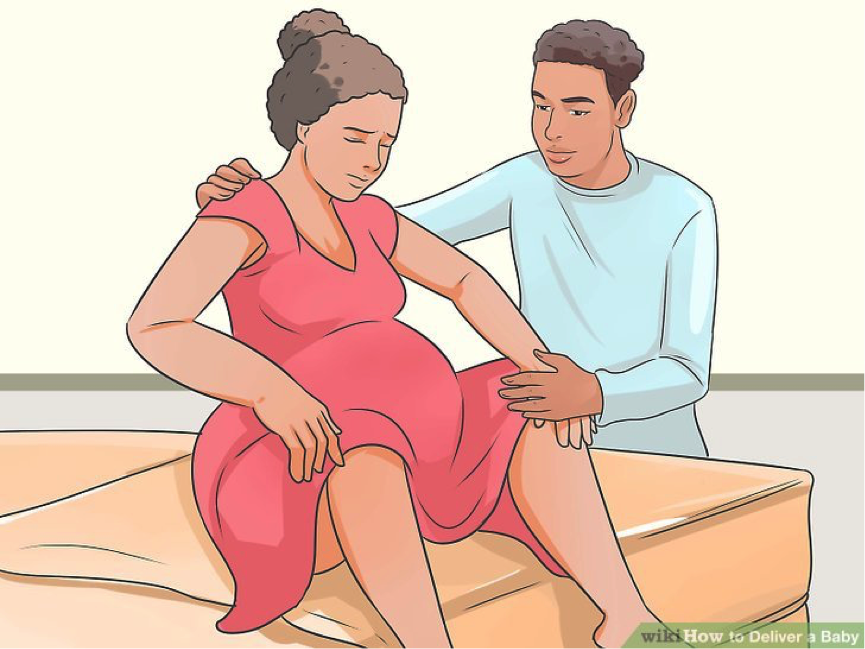
6. Help the mother stay calm
- Ask the mother to undress from the waist down: Provide her with a clean sheet or towel to cover up, if she'd like.
- Encourage her to breathe: Avoid hyperventilation by speaking in a low, soothing voice and verbally directing her breathing. Encourage her to inhale through her nose and out through her mouth in an even, rhythmic manner. If you're still having trouble, hold her hand and take deep, slow breaths along with her.
- Reassure her: This is probably not the birthing experience she had in mind, and she might be worried about potential complications. Tell her help is on the way, and you'll do the best you can in the meantime. Remind her that people have given birth outside of hospitals for thousands of years, and it's more than possible to come through it safely.
- Validate her: The mother may feel scared, angry, giddy, or any combination of those feelings. Validate whatever she is feeling. Don?t try to correct her or argue with her.

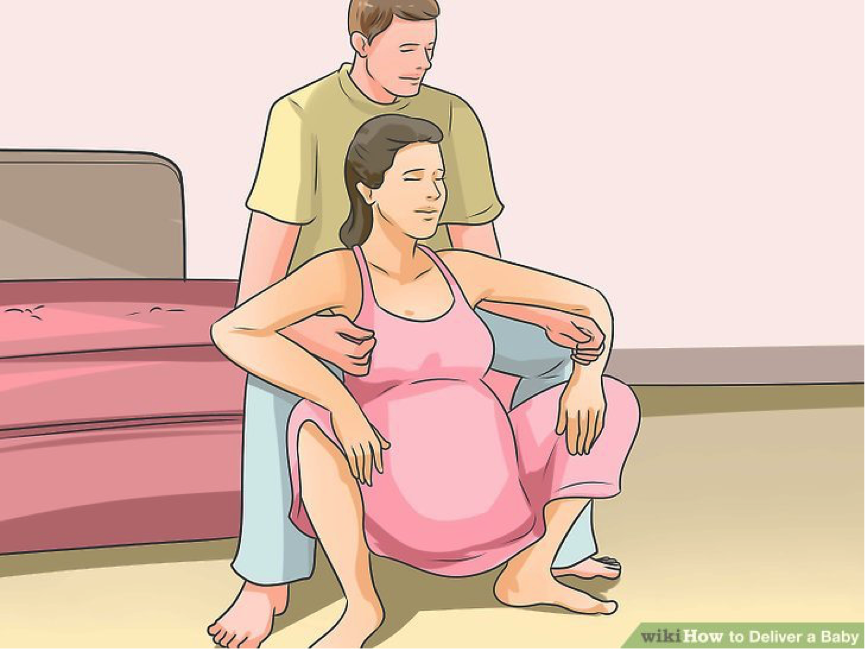
7.Help the mother find a comfortable position
She might want to walk around or crouch down during this stage of labor, especially when a contraction hits. As she starts to transition to the second phase, she might want to settle into a position to give birth or cycle through a few different ones. Switching between positions may help the labor progress more smoothly, but let her decide what's working for her body.
Here are four standard positions, and the pros and cons of each:
- Squatting: This puts gravity to the mother's advantage, and can open the birth canal 20%-30% more than other positions. If you suspect the baby is breech (emerging feet-first), suggest this position as it gives the baby room to rotate. You can help the mother in this position by kneeling behind her and supporting her back.
- All-fours: This position is gravity-neutral and can ease back pain, and the mother might instinctively choose it. It can provide pain relief if the mother has hemorrhoids. Position yourself behind her if that's the case.
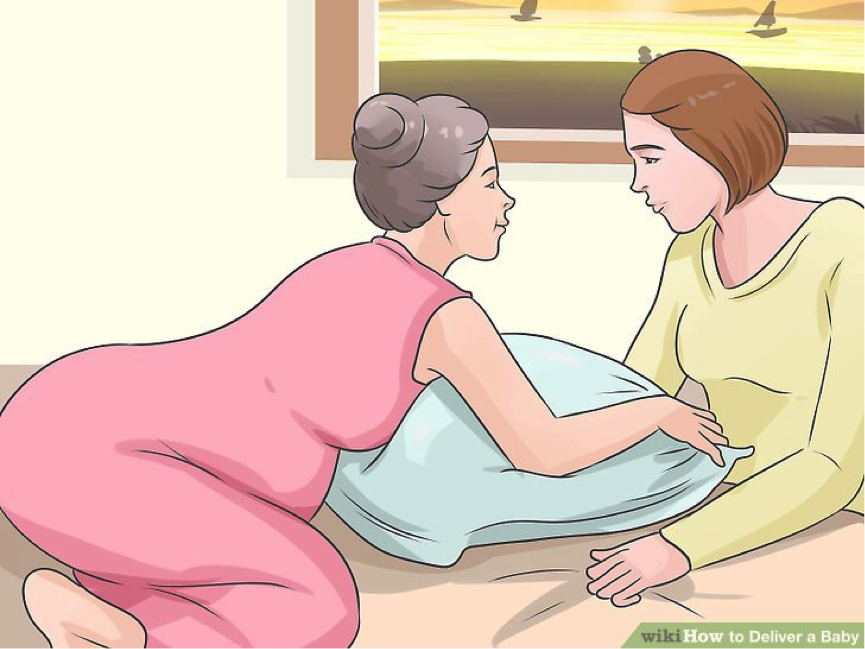
- Side-lying: This leads to a slower descent through the birth canal, but can lead to a more gentle stretching of the perineum and may reduce tearing. Have the mother lie on her side, with her knees bent, and lift the top leg. She might also need to prop herself up on an elbow.
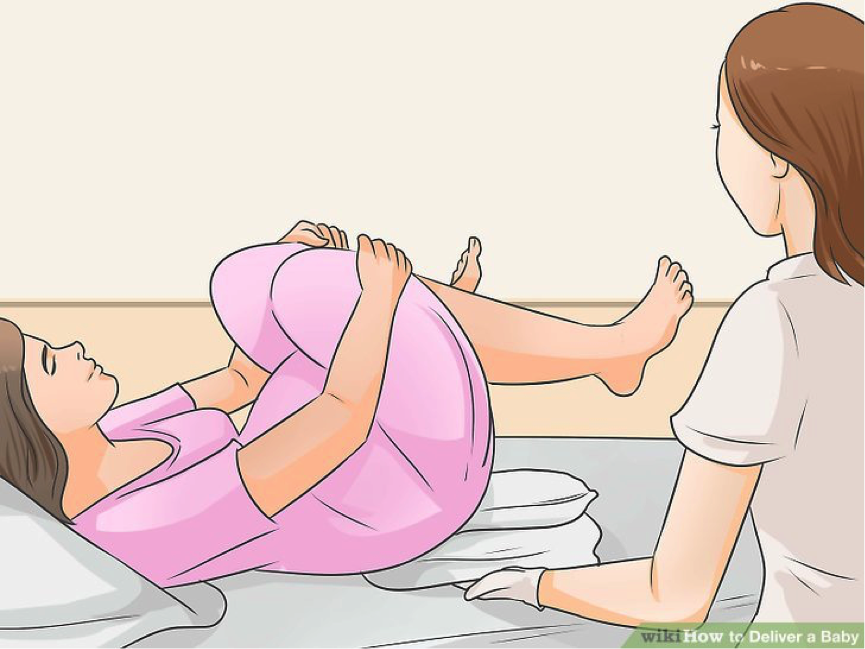
- Lithotomy position (lying back): This is the most common position used in hospitals, with the woman lying flat on her back and her legs bent at the knee. It allows maximum access for the caregiver, but it puts a lot of pressure on the mother's back and is not considered ideal. It also may make contractions slower and more painful. If she seems to prefer this position, try putting a few pillows under her back to ease the pain.
Part 2: Delivering the Baby
1. Guide the mother in pushing
Don't encourage her to push until she feels an unstoppable pressure to do so; you don't want to waste her energy and make her exhausted too early. When women are ready to push, they may feel increased pressure near their low back, perineum, or rectum. It may even feel to her as though she is ready to have a bowel movement. When she is ready, though, you can help guide her through the pushing.
- Ask the mother to curl forward and tuck her chin. This curved position will help the baby through the pelvis. When pushing, it can be helpful if the mother holds her knees or legs with her hands and pulls her legs back.
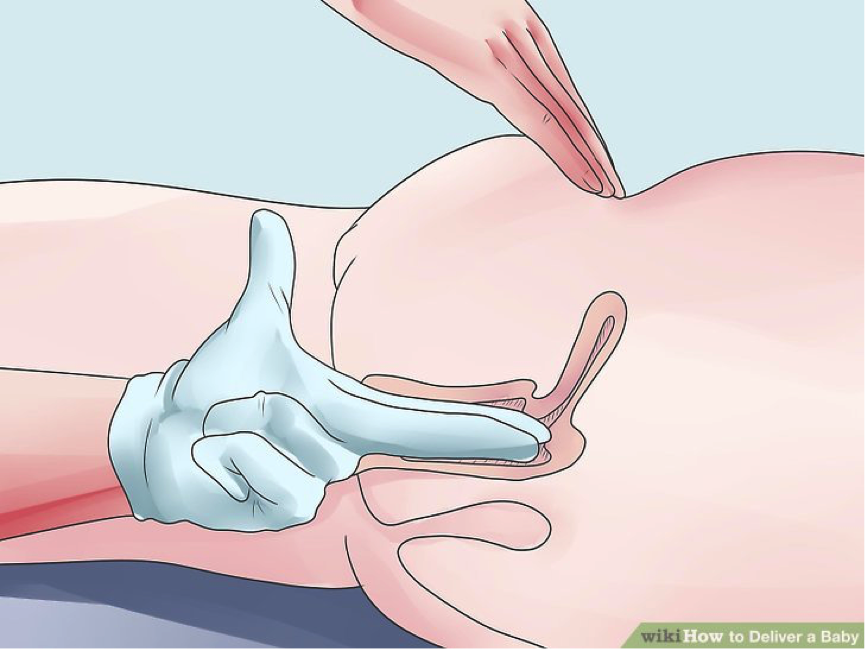
- The area around the vagina will bulge out, until you see the top of the baby's head (crowning). As soon as the baby crowns, it's time for the mother to push in earnest.
- Encourage her to focus her abdominal muscles to push down, as you might do when you?re trying to make your urine come out faster or having a bowel movement. This can help avoid straining or directing the pushing force upward toward the neck and face.
- Three to four pushes, lasting 6-8 seconds each, are considered appropriate per contraction. However, it is important to encourage the mother to do whatever comes naturally to her.
- Keep encouraging deep, slow breathing. Pain can be controlled to different extents through mental relaxation and by concentrating on deep breathing instead of panicking or being distracted by everything that is going on. Different people have different levels of mental control, but deep, slow breathing is always a benefit during childbirth.
- Understand that the woman may urinate or have a bowel movement during labor. This is normal and is not a cause for concern. Don?t even mention it -- you don?t want to embarrass the mother.
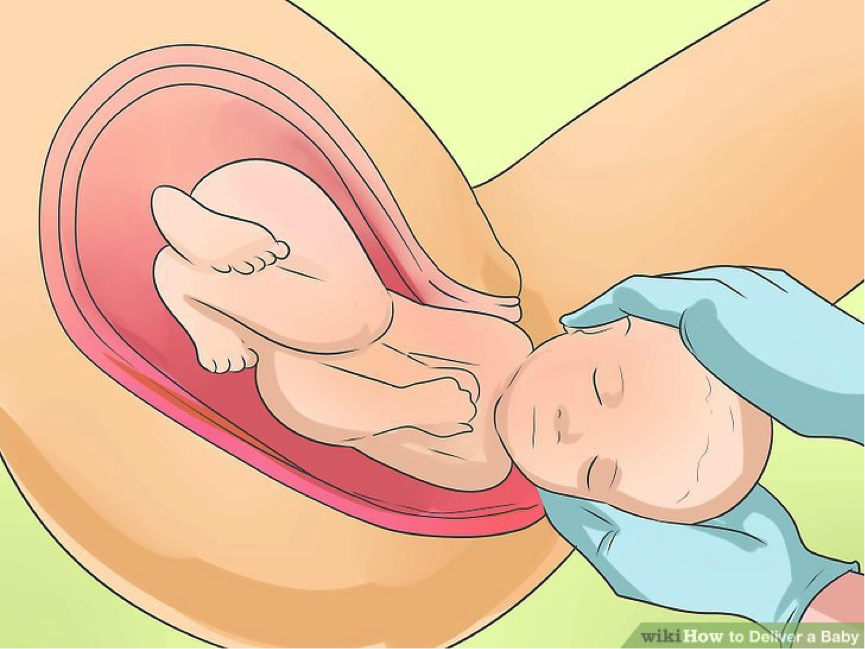
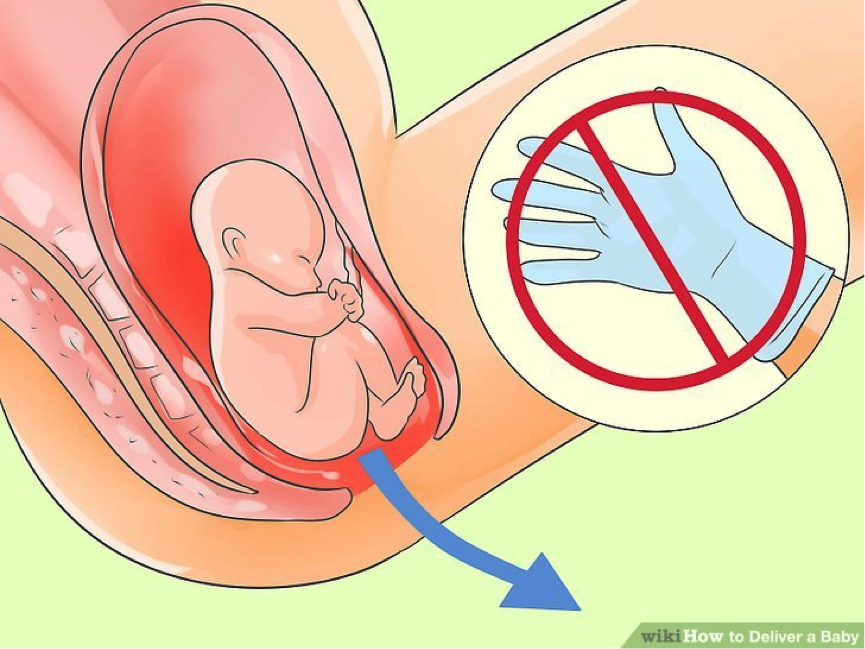
2. Support the baby's head as it emerges
This step isn't complicated, but it's important. Pay extra attention to these tips:
- Do not pull on the baby's head or the umbilical cord. This can cause nerve damage.
- If the cord is wrapped around the baby's neck, which is fairly common, gently lift it over the baby's head or carefully loosen it so the baby can slip through the loop. Do not pull on the cord.
- It?s natural -- and in fact desirable -- for the baby to pass through the pelvis face-down. If the baby?s face is facing toward the mother?s back, don?t worry. This is actually the best position for delivery.
- If instead of the head emerging you see the feet or buttocks coming first, you have a breech birth. See instructions for that situation below.
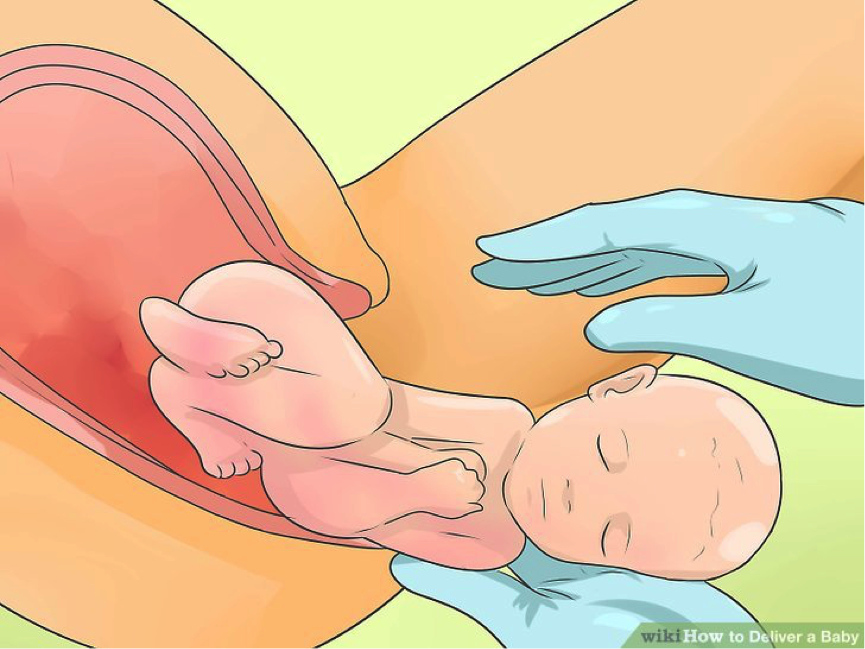
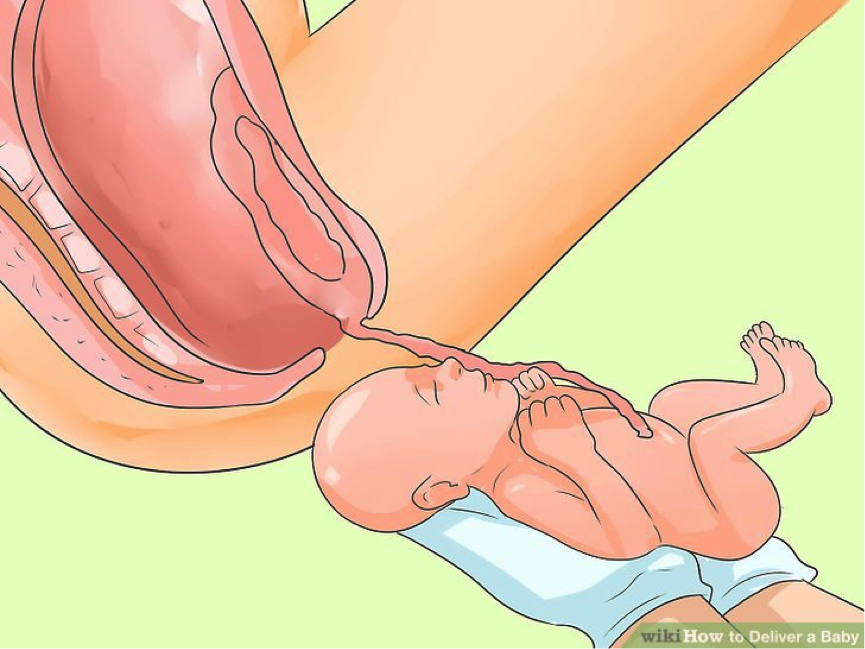
3. Prepare for the body to emerge
When the baby's head rotates to one side (which it will probably do on its own), be prepared for the body to come out with the next push.
- If the baby's head does not rotate to one side, ask the mother to push again. The baby will likely rotate spontaneously.
- If the baby's head doesn't rotate without help, gently turn it to one side. This should help a shoulder emerge with the next push. Don't push it if you feel any resistance.
- Deliver the other shoulder. Gently lift the body toward the mother's stomach to help the other shoulder come through. The rest of the body should follow quickly.
- Keep supporting the head. The body will be slippery. Make sure you're still providing enough support for the baby's neck, which isn't strong enough to support the head on its own.
4. Manage complications
Hopefully, all goes well and you've successfully delivered a healthy baby by now. If the delivery seems stalled, though, here's what you can do:
- If the head comes out and the rest of the body doesn't come out after she pushes three times, have the mother lie on her back. Instruct her to grab her knees and pull her thighs toward her stomach and chest. This is called the McRoberts position, and it's very effective at helping push the baby out. Have her push hard with each contraction.
- Never push on a mother's abdomen to try to help deliver a stuck baby.
- If the feet come out first, see the section on breech birth below.
- If the baby is still stuck and emergency responders are still nowhere near the scene, you could try to guide the baby's head gently downward toward the mother's rectum. This should only be attempted as a last resort, and should not be attempted at all if medical attention will be arriving soon.
5. Hold the baby so the fluids in its mouth and nose drain
Hold the delivered baby with two hands, one supporting its neck and head. Tilt the head down at about a 45-degree angle to allow the fluids to drain. The feet should be slightly above the head (but don't hold the baby by the feet).
- You can also wipe any mucus or amniotic fluid from the nose and mouth area with clean, sterile gauze or cloth.

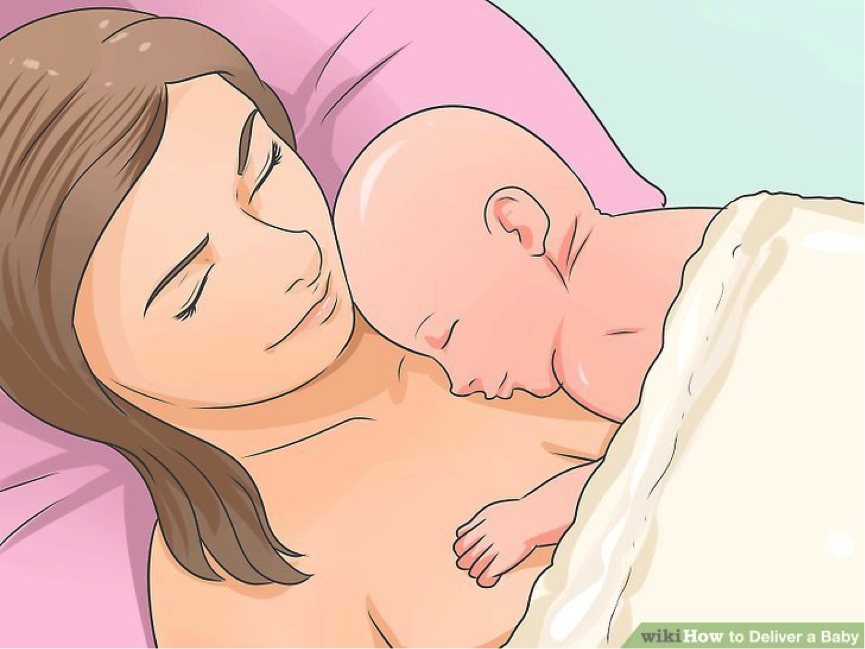
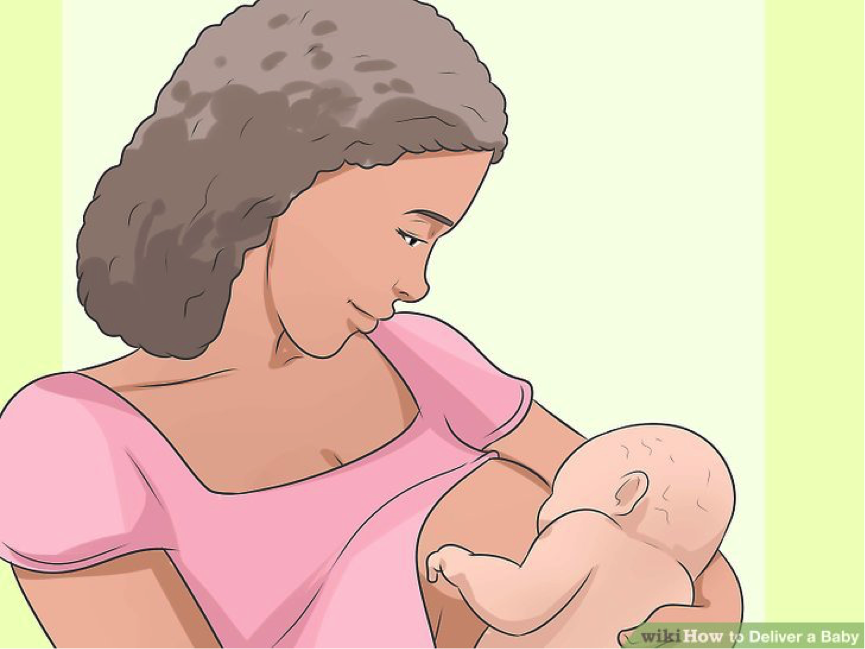
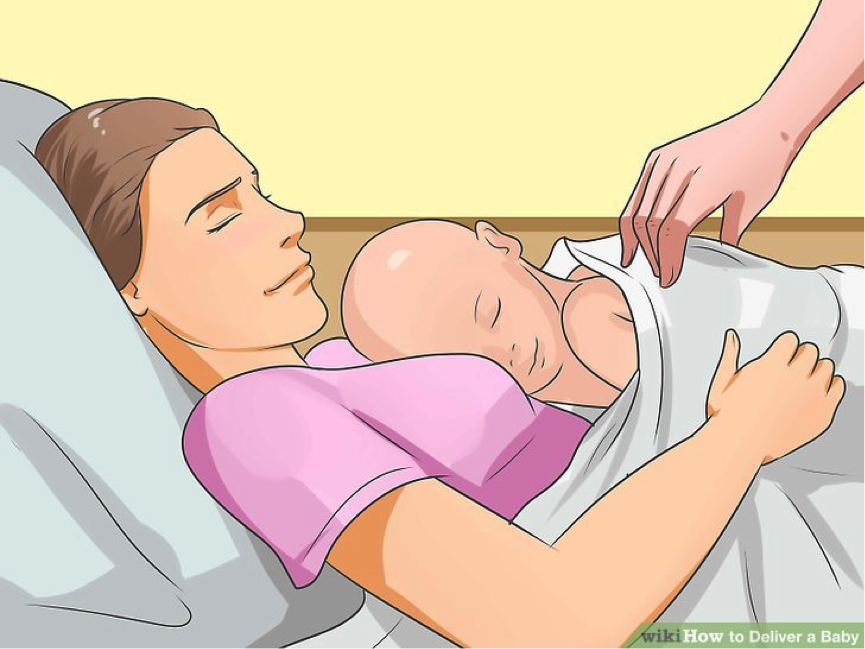
6. Place the baby on the mother's chest
Ensure full-skin contact, and cover them both with clean towels or blankets. The skin-to-skin contact encourages a hormone called oxytocin, which will help the mother deliver the placenta.
- Position the baby so that its head is still slightly lower than the rest of the body, so fluids can keep draining. If the mother is lying down and the baby's head is on her shoulder and its body is on her breast, this should happen naturally.
7. Make sure the baby is breathing
It should be crying slightly. If it's not, you can take a few steps to help make sure the airway is clear.
- Rub the body. Physical touch will help the baby breathe. Rub over its back firmly with a blanket while it's still on the mother's chest. If that's not helping, turn the baby so it's facing the ceiling, tilt the head back to straighten the airway, and keep rubbing the body. It might not cry, but doing this ensures that the baby gets the air it needs.
- Rubbing vigorously with a clean towel can also help stimulate the baby to breathe.
- Manually clear fluids. If the baby gags or turns blue, wipe fluids out of the mouth and nose with a clean blanket or cloth. If that doesn't do the trick, squeeze the air out of a bulb syringe, put the tip in the nose or mouth, and release the bulb to suck the fluid into the bulb. Repeat until all the fluid is cleared, emptying the bulb between uses. If you don't have a bulb, you can use a drinking straw.
- If nothing else has worked, try flicking the soles of the baby's feet with your fingers, or gently popping its bottom. Don't slap the baby.
- If none of this helps, perform infant CPR.
Part 3: Delivering a Breech Birth
1. Know that a breech birth is unlikely
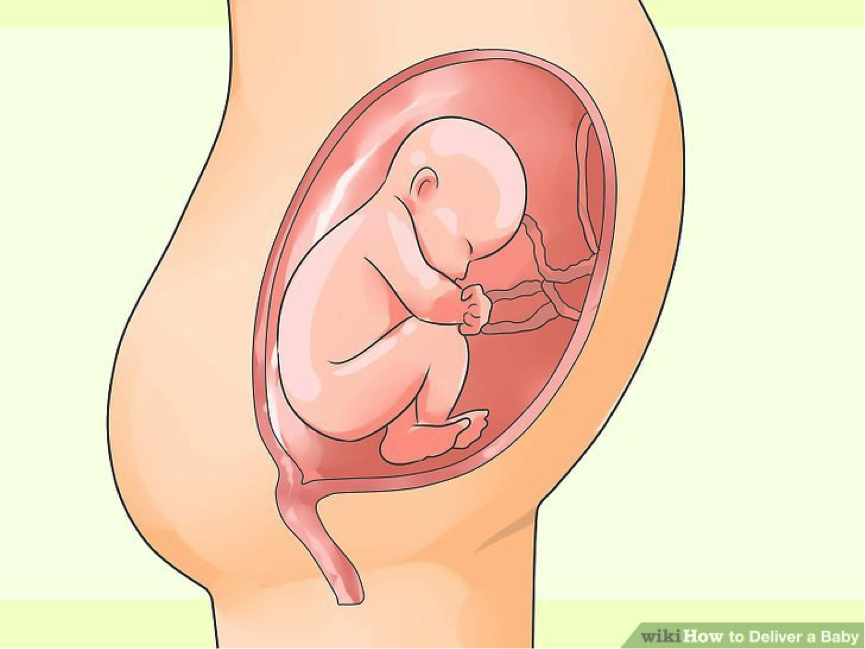
If it happens, a breech birth is a circumstance where the feet or buttocks enter the pelvis first instead of the head coming out.
2. Position the mother
Have her sit at the edge of a bed or other surface and pull her legs to her chest. As a precaution, put down pillows or blankets where the baby is likely to fall.
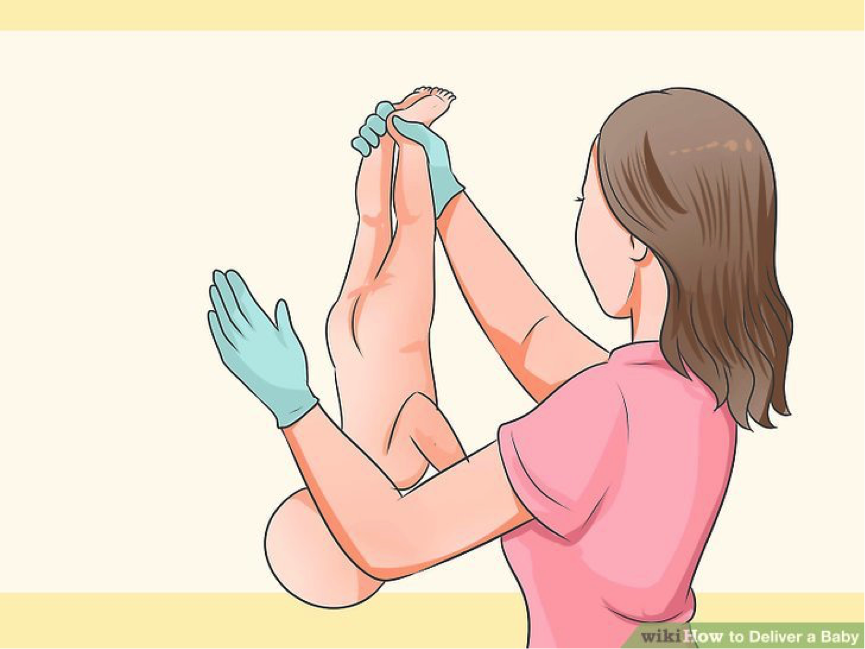
3. Do not touch the baby until the head comes out
You'll see its back and bottom hang down and you'll want to grab it, but don't. You want to avoid touching the baby until the head is delivered because your touch could stimulate the baby to gasp while the head is still submerged in amniotic fluid.
- Try to make sure the room is warm, as a drop in temperature could also cause the baby to gasp.
4. Catch the baby
Once the head is delivered, grab the baby under the arms and bring it up to the mother. If the head doesn't come out in the push after the arms come out, have the mother squat and push.
Part 4: Delivering the Placenta
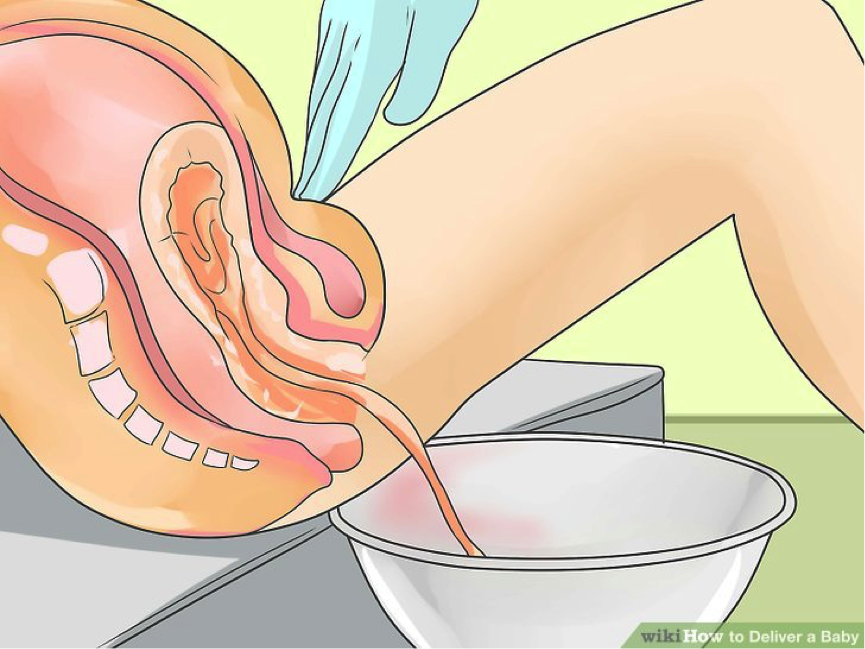
1. Prepare for the placenta
- Put a bowl close to the vagina. Right before it emerges, blood will come out of the vagina and the cord will get longer.
- Have the mother sit up and push the placenta into the bowl.
- Rub the mother's stomach below her belly button firmly to help slow down the bleeding. It might hurt her, but it's necessary. Keep rubbing until the uterus feels like a large grapefruit in the lower belly.
2. Let the baby breast feed
If the cord isn't stretched too tightly by doing so, encourage the mother to breastfeed as soon as possible. This will help stimulate a contraction and encourage the delivery of the placenta. It may also help slow bleeding.
- If breastfeeding isn't an option, stimulating the nipples can also help stimulate delivering the placenta.
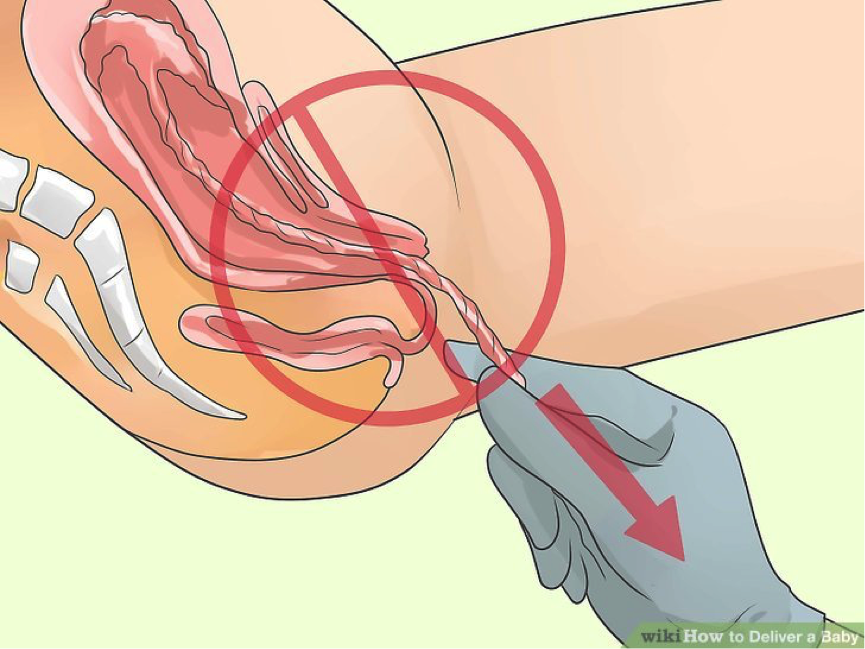
3. Don't pull on the umbilical cord
As the placenta is delivering, don't tug on the cord to hurry it along. Let it come out on its own as the mother pushes. Pulling on it could cause severe damage.
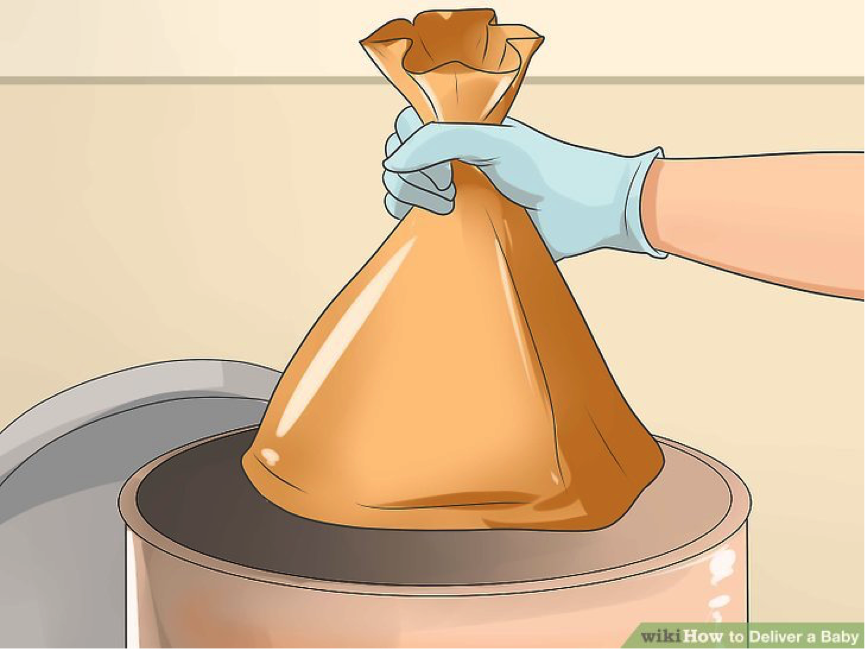
4. Bag the placenta
Once the placenta is out, place it in a trash bag or a container with a lid. When and if the mother goes to a hospital, the doctor might want to inspect the placenta for any abnormalities.
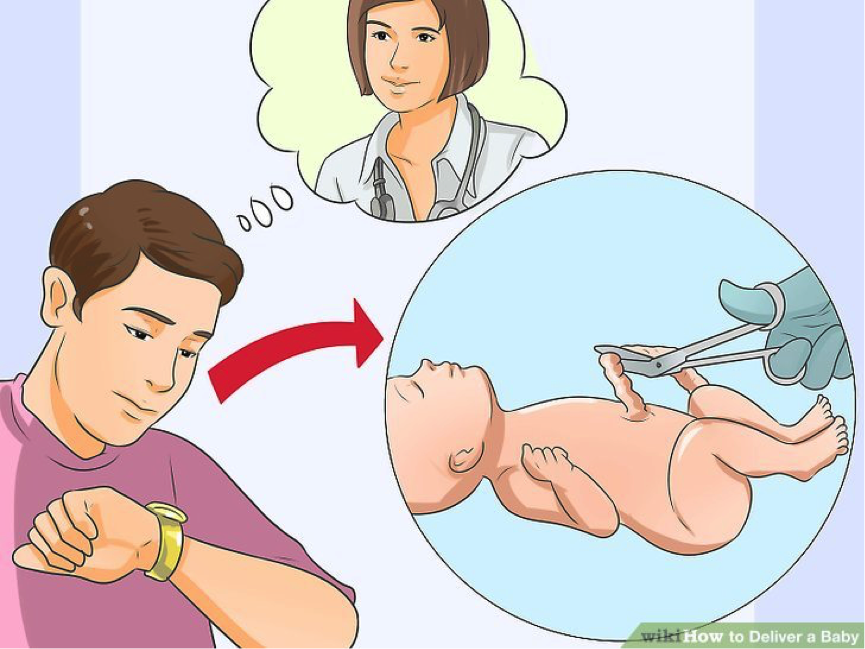
5. Decide whether to cut the cord
You should only cut the umbilical cord if professional medical attention is hours away. Otherwise, leave it alone and just make sure it's not pulled tight.
- If you do need to cut the cord, first feel the cord gently for a pulse. After about ten minutes, the cord will stop pulsing because the placenta has separated. Don't cut it before then.
- Don't worry about pain. There are no nerve endings in an umbilical cord; neither mother nor child will feel pain when its cut. The cord will, however, be slippery and difficult to handle.
- Tie a string or lace around the cord, about three inches from the baby's belly button. Tie it tightly with a double knot.
- Tie another lace about two inches away from the first one, again using a double knot.
- Using a sterile knife or scissors (that have been boiled in water for 20 minutes or wiped down with rubbing alcohol), cut between the two laces. Don't be surprised if it's rubbery and tough to cut; just take your time.
- Cover the baby again when the cord is cut.
Part 5: Caring for the Mother and Baby
1. Keep the mother and baby warm and comfortable
- Control pain: Put an ice pack on the mother's vagina for the first 24 hours to ease soreness and pain. Offer her acetaminophen/paracetamol or ibuprofen if she's not allergic.
- Give the mother something light to eat and a drink: Avoid carbonated drinks and fatty or sugary foods, as these could cause nausea. Toast, crackers, or light sandwiches are good options. The mother may want to rehydrate with an electrolyte-containing sports drink.
- Put a diaper on the baby: Make sure it's below the umbilical cord. If the cut cord smells bad (signaling an infection) clean it with alcohol until it doesn't smell anymore. If you have a small hat available, put it on the baby so it doesn?t catch a chill.
2. Massage the uterus through the abdomen
Sometimes, unexpected deliveries can cause hemorrhaging after delivery. It occurs in up to 18% of all deliveries. To help prevent this, you can firmly massage the uterus.
If you see significant blood flow after the placenta is delivered, do the following:
- Place one (clean) hand inside the vagina. Place your other hand low on the mother's abdomen. Push down with the hand placed on the abdomen as you push against the uterus from the inside with the other hand.
- You can also make firm, repetitive squeezing movements with on hand on the mother's lower abdomen without placing a hand inside the vagina.
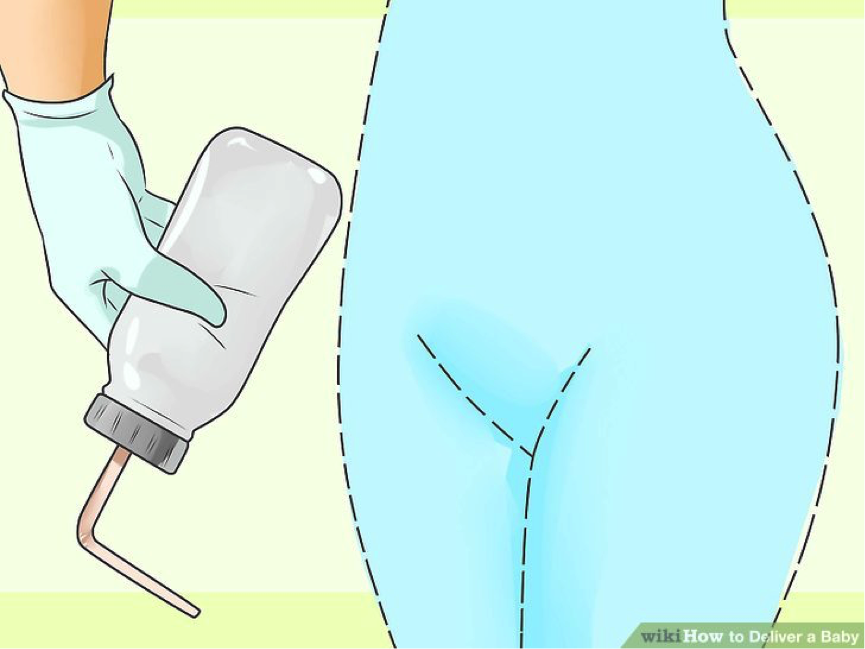
3. Prevent infection while going to the bathroom
Instruct and if necessary help the mother pour warm water over the vagina every time she urinates in order to keep the area clean. You can use a clean squeeze bottle to do this.
- If she needs to have a bowel movement, have her place a clean pad or washcloth against her vagina while she pushes.
- Help the mother urinate. It is good for her to empty her bladder, but due to blood loss it may be best to have her urinate in a pan or on a cloth you can move from under her so she does not have to get up.
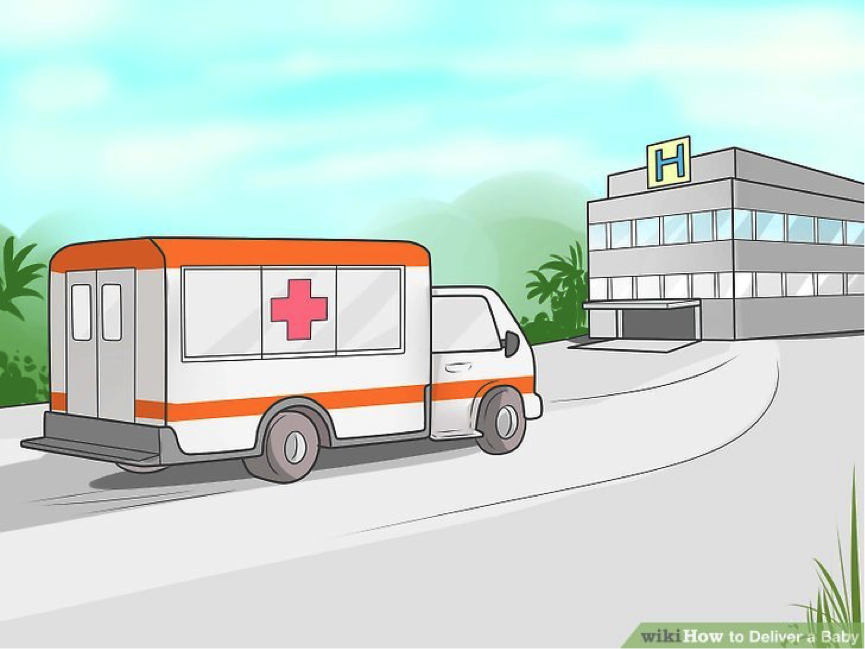
4. Get medical attention as quickly as possible
Once delivery is complete, proceed to the nearest hospital or await the ambulance you called.
_______________________________________________________________________________________________________________________
Are you a healthcare practitioner who enjoys patient education, interaction and communication?
If so, we invite you to criticise, contribute to or help improve our content. We find that many practicing doctors who regularly communicate with patients develop novel and often highly effective ways to convey complex medical information in a simplified, accurate and compassionate manner.
MedSquirrel is a shared knowledge, collective intelligence digital platform developed to share medical expertise between doctors and patients. We support collaboration, as opposed to competition, between all members of the healthcare profession and are striving towards the provision of peer reviewed, accurate and simplified medical information to patients. Please share your unique communication style, experience and insights with a wider audience of patients, as well as your colleagues, by contributing to our digital platform.
Your contribution will be credited to you and your name, practice and field of interest will be made visible to the world. (Contact us via the orange feed-back button on the right).
Disclaimer:
MedSquirrel is a shared knowledge, collective intelligence digital platform developed to share medical knowledge between doctors and patients. If you are a healthcare practitioner, we invite you to criticise, contribute or help improve our content. We support collaboration among all members of the healthcare profession since we strive for the provision of world-class, peer-reviewed, accurate and transparent medical information.
MedSquirrel should not be used for diagnosis, treatment or prescription. Always refer any questions about diagnosis, treatment or prescription to your Doctor.